Tuesday, 18 September 2012

Index Advisor and JDEdwards performance on the AS/400

This is an easy job that can bear a lot of fruit for the AS/400 – Index rationalisation.

Firstly, run some performance monitors over the 400 and trace activity for an hour or two.  For a busy system this could easily write 4GB an hour of logs to your trace file.

View the summary of these traces and look at your read and write / statement ratios

image

Look at your select to insert and update ratios and get a general feel how you might benefit from more indexes (generally you will).  The above shows a fairly normal read:write ratio of 20:1.

You can go through the details of these files and look for the indexes that the 400 had to make on the fly (fix them) and look at the index recommendations that comes from the period, you can easily generate them.

BUT, here is the best thing that the 400 offers – add your production library into the schemas that you see user database, databasename.

image

This will be recording (depending on certain system settings and OS release levels) ALL recommended indexes for that library since the beginning of time (perhaps not literally, but I think that the 400 has been around for that long, well perhaps not literally – hehe).

image

Right click the library / schema that you want to see the indexes advisements for and choose “Index advisor”.

It shows you the following:

image

Holy moly, that is totally AWESOME for tuning.  Create the indexes that you want with another SIMPLE right click “create index”

image

Don’t stress, create index does not just create the index, you gotta name it and do a few other things.  You get the screen above.  You can then copy the details out (Show SQL)

/* Creating index PRODDTA.F4108_SRM01
Sort Sequence: None (Sort by hexadecimal value) */
CREATE INDEX PRODDTA.F4108_SRM01 ON PRODDTA.F4108 (IOMCU ASC , IOLOTN ASC , IODOCO ASC );

Wow, this has been recommended 60 billion times, I might just add it!

Remember to di this for ALL libraries that might get used.  You’ll be surprised when doing it for SY900, SVM900, PRODCTL, DD900 and OL900 ! 

Brace yourself for a faster system.

Reset all of the stats and do it again a few months later.

Extra for Experts! http://publib.boulder.ibm.com/infocenter/iseries/v5r4/index.jsp?topic=%2Frzajq%2Fidxadvisor.htm

The index advisor information can be found in the Database Monitor view 3020 - Index advised (SQE).

The advisor information is stored in columns QQIDXA, QQIDXK and QQIDXD. When the QQIDXA column contains a value of 'Y' the optimizer is advising you to create an index using the key columns shown in column QQIDXD. The intention of creating this index is to improve the performance of the query.

In the list of key columns contained in column QQIDXD the optimizer has listed what it considers the suggested primary and secondary key columns. Primary key columns are columns that should significantly reduce the number of keys selected based on the corresponding query selection. Secondary key columns are columns that may or may not significantly reduce the number of keys selected.

Column QQIDXK contains the number of suggested primary key columns that are listed in column QQIDXD. These are the left-most suggested key columns. The remaining key columns are considered secondary key columns and are listed in order of expected selectivity based on the query. For example, assuming QQIDXK contains the value of 4 and QQIDXD specifies 7 key columns, then the first 4 key columns specified in QQIDXK is the primary key columns. The remaining 3 key columns are the suggested secondary key columns.

http://publib.boulder.ibm.com/infocenter/iseries/v5r4/index.jsp?topic=%2Frzajq%2Fidxadvisor.htm

Create View QQQ3020 as 
(SELECT QQRID as Row_ID,
QQTIME as Time_Created,
QQJFLD as Join_Column,
QQRDBN as Relational_Database_Name,
QQSYS as System_Name,
QQJOB as Job_Name,
QQUSER as Job_User,
QQJNUM as Job_Number,
QQI9 as Thread_ID,
QQUCNT as Unique_Count,
QQUDEF as User_Defined,
QQQDTN as Unique_SubSelect_Number,
QQQDTL as SubSelect_Nested_Level,
QQMATN as Materialized_View_Subselect_Number,
QQMATL as Materialized_View_Nested_Level,
QVP15E as Materialized_View_Union_Level,
QVP15A as Decomposed_Subselect_Number,
QVP15B as Total_Number_Decomposed_SubSelects,
QVP15C as Decomposed_SubSelect_Reason_Code,
QVP15D as Starting_Decomposed_SubSelect,
QQTLN as System_Table_Schema,
QQTFN as System_Table_Name,
QQTMN as Member_Name,
QQPTLN as System_Base_Table_Schema,
QQPTFN as System_Base_Table_Name,
QQPTMN as Base_Member_Name,
QVPLIB as Base_Table_Schema,
QVPTBL as Base_Table_Name,
QQTOTR as Table_Total_Rows,
QQEPT as Estimated_Processing_Time,
QQIDXA as Index_is_Advised,
QQIDXD as Index_Advised_Columns_Short_List,
QQ1000L as Index_Advised_Columns_Long_List,
QQI1 as Number_of_Advised_Columns,
QQI2 as Number_of_Advised_Primary_Columns,
QQRCOD as Reason_Code,
QVRCNT as Unique_Refresh_Counter,
QVC1F as Type_of_Index_Advised,
QQNTNM as NLSS_Table,
QQNLNM as NLSS_Library
FROM UserLib/DBMONTable
WHERE QQRID=3020)
 

OMC OMW promoting F95625 and F95626 records

If you are using some of the more advanced bursting functionality, different email subject lines and or email delivery setup – it’s probably best that you know that you cannot promote this with OMW or define the promotions with OMC.  You’ll need to manually copy the records between your control table environments.  I happened to spend some time trying to solve this for a client today, and then found this reference.

see oracle Bug 11054826 : OMW TRANSFER F95625 F95626 - SAR: 8975106

Friday, 7 September 2012

Have you got big data in JDE… Maybe…

I think big data is measured in TB, especially when it comes to OLTP.  I know that people might disagree, but that’s what I think.  I’m sure that it’s bigger for BI and even bigger for social media feeds, but for me – managing TB’s of OLTP data gives some head aches.

I’ve blogged before on large tables in JDE, and how large their requisite indexes are.  Here is an AS/400 example

  • F0911 90GB
  • F0911_1 6GB
  • F0911_28 6GB

So, 90GB of data and around 140 GB of indexes for F0911.  This is with 610GB of data.  A fairly normal mix I’m here to say!  I feel for the web server if someone wants to “scroll to the end” of the F0911 table in data browser – ouch!  That’s going to crash.

Thursday, 6 September 2012

more detail on BSSV 9.1.0.4 not starting with WLS 10.3.5.0 on unix

I’ve blogged this already, but thought that I’d provide a little more detail.

When you deploy your package to the server, everything goes a little pear shaped.  So I told you to edit the config.xml file for the domain and add a class-path entry.

The file looks like this before:

<server>
  <name>BSSV_PD900</name>
  <ssl>
    <enabled>true</enabled>
    <listen-port>9701</listen-port>
  </ssl>
  <machine>vsydwls02</machine>
  <listen-port>9700</listen-port>
  <server-start>
    <arguments>-Ddefault_path=/u01/app/oracle/e1Agent/SCFHA/targets/BSSV_PD900/config</arguments>
  </server-start>
</server>

And after:L

<server>
<name>BSSV_PD900</name>
<ssl>
<enabled>true</enabled>
<listen-port>9701</listen-port>
</ssl>
<machine>vsydwls02</machine>
<listen-port>9700</listen-port>
<server-start>

<class-path>/u01/app/oracle/Middleware/wlserver_10.3/server/adr/ojdbc6.jar</class-path>
<arguments>-Ddefault_path=/u01/app/oracle/e1Agent/SCFHA/targets/BSSV_PD900/config</arguments>
</server-start>
</server>

save and exit.  restart AdminServer You should be now good to go!

boot.properties restarting WLS without prompts. Booting OVM guests automatically

I know there are write ups everywhere.  I’m responsible for a couple of them too.  I generally write things up when I’m having to actually do some consulting – hence the barrage of emails.

I want my WLS servers to start automatically and I conscious of constantly putting passwords around in /etc/init.d files to get things starting.  Imagine what is going to happen when a password needs to change…  Arrgghh.

So, when looking up this problem on https://support.oracle.com the entry was handy, but not complete.  Here is my attempt:

goto your domains root dir, something like below

/u01/app/oracle/Oracle/Middleware/user_projects/domains/mydomain

cd servers and get a listing

This will tell you the servers that you have installed on this machine:

drwxr-x--- 7 oracle oinstall 4096 Jun  6 16:52 91BSSV
drwxrwxrwx 7 oracle oinstall 4096 May 25 14:11 AdminServer
drwxrwxrwx 3 oracle root     4096 Aug  1 21:27 domain_bak
drwxr-x--- 7 oracle oinstall 4096 Jun 15 09:37 JDE91_BSSV_DV
drwxrwxrwx 8 oracle oinstall 4096 May 25 17:17 JDE91DV
drwxr-x--- 8 oracle oinstall 4096 Aug  1 20:05 JDE91DV_OAM
drwxr-x--- 7 oracle oinstall 4096 Aug  1 18:42 JDE91DVSSO
drwxrwxrwx 3 oracle oinstall 4096 May 25 14:43 myserver

So, you have the opportunity of not entering a password when starting any of these..  you need to go into the SERVERNAME/security dir and create a boot.properties file

When u first create it, you enter the following

username=weblogic

password=your_wls_password

The first time the server starts with this information, it’ll encrypt the entries – so you do not have to mess with them again.  Then – you’ll also be able to do all of your weblogic ini.d’s without entering credentials.  Phew, that is a relief.

But I now have another problem at another level.  I want my VM’s to restart when my OVM host restarts…  How am I going to get this done.
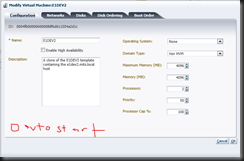
image

See below I’ve kindly offered oracle the intel that they need to get this functionality into the product.  How ‘bout a check box to say “autostart”?  I bet VMWare does it!

So, this is what we need to do:

https://forums.oracle.com/forums/thread.jspa?messageID=2241442

for now, Oracle VM does not do auto restart vm. but you can employ the xen built-in mechanism.

This is on your OVM host machine

[root@MYRSVMH5D ~]# service xendomains status
[root@MYRSVMH5D ~]# ins:                                   [  OK  ]

1) make sure service xendomains is started.
chkconfig xendomains on

[root@MYRSVMH5D ~]# chkconfig --list xendomains
xendomains      0:off   1:off   2:off   3:on    4:on    5:on    6:off

You’d remember this from a previous post – your level definitions.

Code    Information
0    Halt
1    Single-User mode
2    Multi-user mode console logins only (without networking)
3    Multi-User mode, console logins only
4    Not used/User-definable
5    Multi-User mode, with display manager as well as console logins (X11)
6    Reboot

In my example, we are good to go.  xendomains is starting automatically.  So, now all I need is the symlink to the vm.cfg in /etc/xen/auto to get them starting auto!  Nice.

2) make a link in /etc/xen/auto/ to the vm.cfg


Note that this is a bit messy, because of the crazy names in the virtual machine dirs…

in dir /OVS/Repositories/0004fb00000300005dbf9d7f41f5d4c1/VirtualMachines

drwx------ 2 root root 3896 Apr 12 10:37 0004fb00000600001a1a2aeeb16bdb13
drwx------ 2 root root 3896 May  2 19:01 0004fb00000600001efbd53119c02772
drwx------ 2 root root 3896 Apr 11 21:20 0004fb000006000033640d175785768c
drwx------ 2 root root 3896 Aug 14 10:20 0004fb00000600003c194abb88f4d98f
drwx------ 2 root root 3896 Apr 12 10:43 0004fb000006000046b4d76fefb4f810
drwx------ 2 root root 3896 May 30 12:49 0004fb000006000052e2fefa48d85144
drwx------ 2 root root 3896 Apr 12 10:39 0004fb0000060000551f25a281e74b7e
drwx------ 2 root root 3896 Apr 12 10:36 0004fb000006000059953908390579ec
drwx------ 2 root root 3896 Apr 12 10:35 0004fb000006000088f6d611554a2d1c
drwx------ 2 root root 3896 Apr 12 10:41 0004fb000006000092018bb8ea1f02ca
drwx------ 2 root root 3896 Aug 14 11:27 0004fb0000060000921cad8357279178
drwx------ 2 root root 3896 Apr 12 10:38 0004fb000006000097f91be6085ea277
drwx------ 2 root root 3896 May 24 19:59 0004fb0000060000b9eb8c9ebed064bd
drwx------ 2 root root 3896 Apr 12 10:36 0004fb0000060000bcf3ee0f0ec3db82
drwx------ 2 root root 3896 May 20 19:48 0004fb0000060000ed81741bfc2fc727
drwx------ 2 root root 3896 Jul  2 11:30 0004fb0000060000f45d2aa20cdf6c44
drwx------ 2 root root 3896 Apr 12 10:38 0004fb0000060000fd1500d07f440918

So, I execute the following to find the simple machine name, telling me what is what…  Then I can calso create the sym links easier

find . -name vm.cfg -exec grep -i -H OVM_Simple_name {} \;

./0004fb000006000088f6d611554a2d1c/vm.cfg:OVM_simple_name = 'E1DEV2'
./0004fb00000600003c194abb88f4d98f/vm.cfg:OVM_simple_name = 'E1BSS'
./0004fb0000060000551f25a281e74b7e/vm.cfg:OVM_simple_name = 'E1DB'
./0004fb000006000092018bb8ea1f02ca/vm.cfg:OVM_simple_name = 'E1ENT'
./0004fb000006000046b4d76fefb4f810/vm.cfg:OVM_simple_name = 'E1WEB'
./0004fb000006000059953908390579ec/vm.cfg:OVM_simple_name = 'E1DEP'
./0004fb0000060000bcf3ee0f0ec3db82/vm.cfg:OVM_simple_name = 'E1DEV'
./0004fb00000600001efbd53119c02772/vm.cfg:OVM_simple_name = 'JDEDEP2'
./0004fb000006000033640d175785768c/vm.cfg:OVM_simple_name = 'MYRSDB05'
./0004fb0000060000fd1500d07f440918/vm.cfg:OVM_simple_name = 'Thingy'
./0004fb00000600001a1a2aeeb16bdb13/vm.cfg:OVM_simple_name = 'cvdvdb'
./0004fb000006000097f91be6085ea277/vm.cfg:OVM_simple_name = 'myrdba'
./0004fb0000060000ed81741bfc2fc727/vm.cfg:OVM_simple_name = 'e1ent2'
./0004fb0000060000b9eb8c9ebed064bd/vm.cfg:OVM_simple_name = 'e1web2'
./0004fb000006000052e2fefa48d85144/vm.cfg:OVM_simple_name = 'e1oid'
./0004fb0000060000f45d2aa20cdf6c44/vm.cfg:OVM_simple_name = 'MYREM12C'
./0004fb0000060000921cad8357279178/vm.cfg:OVM_simple_name = 'e1sec'

ok, how about we get that command to create the symbolic links?  easy too!  Well, maybe no so easy…  Use the following command to generate the sym links and use proper names for them.  Execute the results!

find . -name vm.cfg -exec grep -i -H OVM_Simple_name {} \; |awk -F: '{printf("ln -s /OVS/Repositories/0004fb00000300005dbf9d7f41f5d4c1/VirtualMachines/%s %s\n",$1,$2)}' | awk '{printf("%s %s %s /etc/xen/auto/%s\n", $1, $2, $3, $6)}' | sed "s/'//g"

[root@MYRSVMH5D VirtualMachines]# find . -name vm.cfg -exec grep -i -H OVM_Simple_name {} \; |awk -F: '{printf("ln -s /OVS/Repositories/0004fb00000300005dbf9d7f41f5d4c1/VirtualMachines/%s %s\n",$1,$2)}' | awk '{printf("%s %s %s /etc/xen/auto/%s\n", $1, $2, $3, $6)}' | sed "s/'//g"
ln -s /OVS/Repositories/0004fb00000300005dbf9d7f41f5d4c1/VirtualMachines/./0004fb000006000088f6d611554a2d1c/vm.cfg /etc/xen/auto/E1DEV2
ln -s /OVS/Repositories/0004fb00000300005dbf9d7f41f5d4c1/VirtualMachines/./0004fb00000600003c194abb88f4d98f/vm.cfg /etc/xen/auto/E1BSS
ln -s /OVS/Repositories/0004fb00000300005dbf9d7f41f5d4c1/VirtualMachines/./0004fb0000060000551f25a281e74b7e/vm.cfg /etc/xen/auto/E1DB
ln -s /OVS/Repositories/0004fb00000300005dbf9d7f41f5d4c1/VirtualMachines/./0004fb000006000092018bb8ea1f02ca/vm.cfg /etc/xen/auto/E1ENT
ln -s /OVS/Repositories/0004fb00000300005dbf9d7f41f5d4c1/VirtualMachines/./0004fb000006000046b4d76fefb4f810/vm.cfg /etc/xen/auto/E1WEB
ln -s /OVS/Repositories/0004fb00000300005dbf9d7f41f5d4c1/VirtualMachines/./0004fb000006000059953908390579ec/vm.cfg /etc/xen/auto/E1DEP
ln -s /OVS/Repositories/0004fb00000300005dbf9d7f41f5d4c1/VirtualMachines/./0004fb0000060000bcf3ee0f0ec3db82/vm.cfg /etc/xen/auto/E1DEV
ln -s /OVS/Repositories/0004fb00000300005dbf9d7f41f5d4c1/VirtualMachines/./0004fb00000600001efbd53119c02772/vm.cfg /etc/xen/auto/JDEDEP2
ln -s /OVS/Repositories/0004fb00000300005dbf9d7f41f5d4c1/VirtualMachines/./0004fb000006000033640d175785768c/vm.cfg /etc/xen/auto/MYRSDB05
ln -s /OVS/Repositories/0004fb00000300005dbf9d7f41f5d4c1/VirtualMachines/./0004fb0000060000fd1500d07f440918/vm.cfg /etc/xen/auto/Thingy
ln -s /OVS/Repositories/0004fb00000300005dbf9d7f41f5d4c1/VirtualMachines/./0004fb00000600001a1a2aeeb16bdb13/vm.cfg /etc/xen/auto/cvdvdb
ln -s /OVS/Repositories/0004fb00000300005dbf9d7f41f5d4c1/VirtualMachines/./0004fb000006000097f91be6085ea277/vm.cfg /etc/xen/auto/myrdba
ln -s /OVS/Repositories/0004fb00000300005dbf9d7f41f5d4c1/VirtualMachines/./0004fb0000060000ed81741bfc2fc727/vm.cfg /etc/xen/auto/e1ent2
ln -s /OVS/Repositories/0004fb00000300005dbf9d7f41f5d4c1/VirtualMachines/./0004fb0000060000b9eb8c9ebed064bd/vm.cfg /etc/xen/auto/e1web2
ln -s /OVS/Repositories/0004fb00000300005dbf9d7f41f5d4c1/VirtualMachines/./0004fb000006000052e2fefa48d85144/vm.cfg /etc/xen/auto/e1oid
ln -s /OVS/Repositories/0004fb00000300005dbf9d7f41f5d4c1/VirtualMachines/./0004fb0000060000f45d2aa20cdf6c44/vm.cfg /etc/xen/auto/MYREM12C
ln -s /OVS/Repositories/0004fb00000300005dbf9d7f41f5d4c1/VirtualMachines/./0004fb0000060000921cad8357279178/vm.cfg /etc/xen/auto/e1sec

As you see we are done.  I then delete the machines that I do not care to autostart

[root@MYRSVMH5D VirtualMachines]# ls -l  /etc/xen/auto
total 68
lrwxrwxrwx 1 root root 108 Sep  6 10:39 cvdvdb -> /OVS/Repositories/0004fb00000300005dbf9d7f41f5d4c1/VirtualMachines/./0004fb00000600001a1a2aeeb16bdb13/vm.cfg
lrwxrwxrwx 1 root root 108 Sep  6 10:39 E1BSS -> /OVS/Repositories/0004fb00000300005dbf9d7f41f5d4c1/VirtualMachines/./0004fb00000600003c194abb88f4d98f/vm.cfg
lrwxrwxrwx 1 root root 108 Sep  6 10:39 E1DB -> /OVS/Repositories/0004fb00000300005dbf9d7f41f5d4c1/VirtualMachines/./0004fb0000060000551f25a281e74b7e/vm.cfg
lrwxrwxrwx 1 root root 108 Sep  6 10:39 E1DEP -> /OVS/Repositories/0004fb00000300005dbf9d7f41f5d4c1/VirtualMachines/./0004fb000006000059953908390579ec/vm.cfg
lrwxrwxrwx 1 root root 108 Sep  6 10:39 E1DEV -> /OVS/Repositories/0004fb00000300005dbf9d7f41f5d4c1/VirtualMachines/./0004fb0000060000bcf3ee0f0ec3db82/vm.cfg
lrwxrwxrwx 1 root root 108 Sep  6 10:39 E1DEV2 -> /OVS/Repositories/0004fb00000300005dbf9d7f41f5d4c1/VirtualMachines/./0004fb000006000088f6d611554a2d1c/vm.cfg
lrwxrwxrwx 1 root root 108 Sep  6 10:39 E1ENT -> /OVS/Repositories/0004fb00000300005dbf9d7f41f5d4c1/VirtualMachines/./0004fb000006000092018bb8ea1f02ca/vm.cfg
lrwxrwxrwx 1 root root 108 Sep  6 10:39 e1ent2 -> /OVS/Repositories/0004fb00000300005dbf9d7f41f5d4c1/VirtualMachines/./0004fb0000060000ed81741bfc2fc727/vm.cfg
lrwxrwxrwx 1 root root 108 Sep  6 10:39 e1oid -> /OVS/Repositories/0004fb00000300005dbf9d7f41f5d4c1/VirtualMachines/./0004fb000006000052e2fefa48d85144/vm.cfg
lrwxrwxrwx 1 root root 108 Sep  6 10:39 e1sec -> /OVS/Repositories/0004fb00000300005dbf9d7f41f5d4c1/VirtualMachines/./0004fb0000060000921cad8357279178/vm.cfg
lrwxrwxrwx 1 root root 108 Sep  6 10:39 E1WEB -> /OVS/Repositories/0004fb00000300005dbf9d7f41f5d4c1/VirtualMachines/./0004fb000006000046b4d76fefb4f810/vm.cfg
lrwxrwxrwx 1 root root 108 Sep  6 10:39 e1web2 -> /OVS/Repositories/0004fb00000300005dbf9d7f41f5d4c1/VirtualMachines/./0004fb0000060000b9eb8c9ebed064bd/vm.cfg
lrwxrwxrwx 1 root root 108 Sep  6 10:39 JDEDEP2 -> /OVS/Repositories/0004fb00000300005dbf9d7f41f5d4c1/VirtualMachines/./0004fb00000600001efbd53119c02772/vm.cfg
lrwxrwxrwx 1 root root 108 Sep  6 10:39 myrdba -> /OVS/Repositories/0004fb00000300005dbf9d7f41f5d4c1/VirtualMachines/./0004fb000006000097f91be6085ea277/vm.cfg
lrwxrwxrwx 1 root root 108 Sep  6 10:39 MYREM12C -> /OVS/Repositories/0004fb00000300005dbf9d7f41f5d4c1/VirtualMachines/./0004fb0000060000f45d2aa20cdf6c44/vm.cfg
lrwxrwxrwx 1 root root 108 Sep  6 10:39 MYRSDB05 -> /OVS/Repositories/0004fb00000300005dbf9d7f41f5d4c1/VirtualMachines/./0004fb000006000033640d175785768c/vm.cfg
lrwxrwxrwx 1 root root 108 Sep  6 10:39 Thingy -> /OVS/Repositories/0004fb00000300005dbf9d7f41f5d4c1/VirtualMachines/./0004fb0000060000fd1500d07f440918/vm.cfg

Wednesday, 5 September 2012

debugging compile and link problems for JDE on linux

The compilation & link process on linux for JD Edwards is pretty simple at the end of the day.

The package build process on the deployment server (or thick client) sends over all of the C and include files into $EVRHOME/packages/<packagename> folder.  All of the source files are separated by DLL name, this is handy when linking source files back to DLL name.

Once this is done, the deployment server instructs the package build kernel to start compiling and then linking.

JDE.INI file settings are read for these commands, so it gives you a chance to add in your own libraries if you are compiling them in on the server – nice!

[BSFN BUILD]
BuildArea=/u01/jdedwards/e900/packages
OptimizationFlags=-O3 -fno-strict-aliasing
DebugFlags=-g -D_DEBUG -DJDEDEBUG
InliningFlags=
DefineFlags=-DKERNEL -DPRODUCTION_VERSION -DNATURAL_ALIGNMENT -D_GNU_SOURCE
#CompilerFlags=-fPIC -Wall -m32 -c
CompilerFlags=-fPIC -m32 -c
OSReleaseLevel=
LinkFlags=-melf_i386 -shared -L/u01/jdedwards/e900/system/lib -ljdesaw -z muldefs
LinkLibraries=
SimultaneousBuilds=5


Sample INI file section above

All Compile logs are written to $EVRHOME/packages/<packagename>/CompileLogs/DLLNAME/source.err

To view all of the errors at compile time, enter a command like “find $EVRHOME/packages/packagename  –name *.err –exec more {} \;

Note that if you use package build history, they’ll be appended too – which is sometimes a pain. change the –exec more {} \; to rm –f {} \; to delete them all for a a retry.

You generally get problems with includes or missing DSTR items in these logs.

A compile command in JDE looks something like:

cc -fPIC -m32 -c -O3 -fno-strict-aliasing  -DKERNEL -DPRODUCTION_VERSION -DNATURAL_ALIGNMENT -D_GNU_SOURCE -DUSESPECIALGPA4BB -DUSETABLEHEADERFROMINCLUDEA   -I/u01/jdedwards/e900/packages/PD900FB/include/  -I/u01/jdedwards/e900/system/include  -I/u01/jdedwards/e900/system/include/xml  -I/u01/jdedwards/e900/system/includev '

Then

'cc -E -fPIC -m32    -O3 -fno-strict-aliasing  -DKERNEL -DPRODUCTION_VERSION -DNATURAL_ALIGNMENT -D_GNU_SOURCE -DUSESPECIALGPA4BB -DUSETABLEHEADERFROMINCLUDEA   -I/u01/jdedwards/e900/packages/PD900FB/include/  -I/u01/jdedwards/e900/system/include  -I/u01/jdedwards/e900/system/include/xml  -I/u01/jdedwards/e900/system/includev '.

Linking

This is more problematic on linux.  There are quite a few issues on support.oracle.com about this. 

At the end of the day, JDE runs a command like the following to kick off the compile and link, you can do this yourself to QUICKLY test changes that you make to the ini or includes on the server.  Note that any changes to the JDE.INI will be read immediately by this command, because it’s a new process.

builddll /u01/jdedwards/e900/packages/PD900FB/text/JDBTRG3.txt

It writes status to:

/u01/jdedwards/e900/packages/PD900FB/text/JDBTRG3.sts

It writes logs to

builddll /u01/jdedwards/e900/packages/PD900FB/text/JDBTRG3.log

So, once all of the compiling is complete, it runs the link for all the .o’s that it’s created:

'ld -melf_i386 -shared -L/u01/app/jdedwards/e900/system/lib -ljdesaw -z muldefs -o /u01/jdedwards/e900/packages/PD900FB/bin32/libJDBTRG4.so *.o >> JDBTRG4.log 2>&1'

Pretty simple hey.  You can manually run any of these commands to check out which of your settings are not right in the JDE.INI and fix them

Monday, 3 September 2012

DB links and RAC

You learn something new every day.

I followed my previously used simple guide to creating DB links and now get a new oracle error when using the link – not on creation:

I’m signed into e1test and creating a link to e1prod.


create public database link "jde_e1prod"
connect to JDE
identified by r1PP3Rpasswd
using 'e1prod';

A couple things about the statement above.  Ripper password hey?  Also, I like to user the user I connect as in the link name, helps out later on.


Error starting at line 1 in command:
INSERT INTO DV900.F983051 SELECT * FROM DV900.F983051@e1prod
Error at Command Line:1 Column:54
Error report:
SQL Error: ORA-02085: database link E1PROD.OSL.LOCAL connects to E1PROD
02085. 00000 -  "database link %s connects to %s"
*Cause:    a database link connected to a database with a different name.
           The connection is rejected.
*Action:   create a database link with the same name as the database it
           connects to, or set global_names=false.

I can only guess that this means there is a problem between the actual RAC node that I’m talking to and the generic name of the database.  This is my assumption from running:

SELECT INSTANCE_name from v$instance;

And getting something like:

e1test2 (but my instance is e1test).

A quick google shows me: Option 1:

names.default_domain = domain.com

But what about the ramifications?  Option 2:

alter system set global_names=false;

Same question

I went for the second option, and viola – it worked.  Thank you google and thank u oracle.